Life has been absolutely INSANE since September started! I introduced some new teaching material that has been a great learning experience for me but has kept me off of blogging among other things. This is a post I have been working on for a while that I finally had the chance to finish!
This is the latest chapter in my adventure into liking all food. I am on a journey to be a less picky eater and enjoy all food that is presented to me. I think that with some amazing recipes and the slow but consistent approach to eating something you dislike, you will start to actually enjoy those recipes and even want to eat those dreaded items.
Foods on my dislikes list include onions, mushrooms, fish, seafood and lamb. So far I have been incredibly successful with onions and mushrooms. Onions were fairly easy because I could tolerate them cooked but what really sold me on onions were the small grilled onions (cebollitas) in Mexico...oh so sweet and delicious in a taco!

Mushrooms took a little longer. It took a year of eating mushroom risotto with the mushroom chunks getting bigger with every time we made it to finally be ok with eating them in other dishes. I am now even eating them raw in spinach salad!!!!
 Image from: manjamakan.tumblr.com
I have tried scallops...twice...once in 2008 (see the delicious Mexican recipe posted
here) and again this past Spring when my parents visited for Easter. I guess I have been slacking on my slow and consistent method here...

In comes the fish. Fish has been on my I really DON'T like at all list for a long time...well except when beer battered, deep fried and covered in tartar sauce...but then is it still really fish at this point? Knowing this, imagine Diego's surprise when I came to him and suggested we buy a half share in the new Community Supported Fishery (CSF - for more info on it see EcoYogini's great post and interview
here) called
Off the Hook. The idea of paying in to the fishery at the start of the season to share in the bounty and in the hard times with the fisherman was very appealing. Not to mention getting to know the fisherman and supporting a sustainable hook and line fishery rather than the destructive dragging of the ocean floor. Bottom trawling, which is how bottom dwelling fish like haddock, cod, hake, etc. are caught and is THE MOST DESTRUCTIVE way to fish.
 Image from: http://shrimpsuck.blogspot.com/2010_03_01_archive.html
 Image from: http://www.leicesterfoe.org.uk/marine.html
The giant net drags across the bottom catching everything in its path (including deep sea corals, sponges, crabs, and the list goes on) and wreaking havoc on the bottom. Destroying the habitat that these fisheries actually depend on (talk about shoot yourself in the foot)...

...and throwing away anything not in the quota. This deep sea coral grows in the dark cold waters of the Atlantic and took HUNDREDS of years to grow that size and it is just being tossed over the side of a deep sea dragger.
 Image from:http://news.bbc.co.uk/2/shared/spl/hi/pop_ups/05/sci_nat_bottom_trawled0_bottom_cleared/html/5.stm
The critters below are also bycatch and are what most of the fish we are catching eat, so we are at the same time decimating the food source of any remaining fish...any wonder why our fisheries are collapsing...we are taking out too much, destroying their habitat and food supply with destructive fishing methods and near the coasts we are also assaulting their nurseries with our pollution and coastal development...
Knowing all of this, I bit the bullet and decided that we would try one season and if I hated it...at least I gave it a fair go and helped the program get off the ground. We had 5.5 lbs of fresh whole but gutted fish almost every week for 18 weeks this Summer and Fall! This translates into fish for at least 3 meals a week!!
 Haddock about to be filleted.
I got to fillet my first ever fish and did a decent job of it! Although this ended up being Diego's job most of the time.

We always cooked all of the fish right away since freezing them or leaving them whole for a couple of days added to the fishy flavour that I don't enjoy. The fish were always less than 15 hours out of the water before they hit our pan. The taste was amazing! No fishy flavour whatsoever and once cooked they kept their fresh taste for the three meals!

To ease me into eating fish we started with an old favorite....Fish Tacos! These are essentially battered and fried little pieces of fish that you can put into a fresh corn tortilla with some Mexican Tartar sauce and Guacamole. Delicious! We used a typical beer batter (with Corona of course) and the Mexican Tartar sauce is just mayo, pickles and grated carrots! I will post my AMAZING guacamole recipe soon. :) It is a party pleaser.

After a couple of weeks of fish tacos we ventured to try another Mexican Favorite that I and all of the guests we made it for enjoyed very much and it is very simple...however, I don't remember what it is called! It is fresh haddock fillets layered (in this order) with juliened onions, diced tomatoes, secret sauce (see below) and topped with some dabs of butter. You wrap this all up in a large amount of tin foil and bake it in the oven or BBQ. You want enough foil to be able to flip it often to cook evenly and not have any juices come out. We ate this several times because it is SO GOOD!
Secret Sauce:
75% mayo, 25% mustard
I would make enough to have 2-3 tablespoons of sauce per layer of fish.
Once it is cooked (this will depend on how much fish you have) just slice open the top of the foil layer stick some spoons in and place it in the middle of the table. Spoon contents into a corn (or flour) tortilla, add some guacamole and ENJOY!

Closer to the end, I started to feel a little more adventurous and we made an amazing baked lemon rosemary haddock with a dill cream sauce. I used fresh rosemary from my garden and dill from the farmer's market. I lay the fillets on a bed of lemons then topped them with a few lemons and sprigs of rosemary and baked them in the oven at 350F until the fish was cooked (30-40 mins). In the mean time I made a creamy dill sauce using
this recipe. We ate it with a side of Greek style baked sweet and red potatoes with onions (essentially olive oil with a very small amount of dill, and salt and pepper to taste, baked in my cast iron dutch oven in the oven beside the fish). The combination was AMAZING! Neither the dill or the rosemary were too strong. They were subtle and the combination was perfect. I scarfed this plate down pretty fast!

One of the last recipes we tried was the Moist Baked Haddock recipe found
here. I did substitute the Pepperidge farm stuffing with Italian style bread crumbs.

We did enjoy this recipe but we really liked the bread crumbs so we would often just bread and bake the fish (no mayo, etc) to eat in tacos (of course with some salsa or guacamole!) or just straight up with some veggies on the side.
We both loved joining the CSF and will join again in the Spring. It is an amazing opportunity to support a truly sustainable fishery and get all the benefits of eating fish while feeling good rather than guilty about it! We also, really got to know the organizers and the fisherman. We met their families and know our money is going to support them directly and not some faceless corporation. If you are in Halifax, the Valley or Digby and you eat fish, you should definitely
check them out!
To learn more about fisheries you can watch the documentary
The End of the Line or take a look at
Seachoice.org.
Don't have a CSF near you...here are some things that you can do:
- There are some fisheries that are being sustainably managed, buy these fish. To know which ones check out the Canadian Seafood Guide and the Canadian Sushi Guide at Seachoice.org.
- When in a restaurant, ask questions about where the fish comes from and how it was caught! The restaurant owners will become more informed and buy what the customer wants but they won't know unless you ask!
- Not all fisheries are equally destructive so you will need to arm yourself with information to be able to make the right choices and ask the right questions.
Happy Fishing!


 Our collection in a cute basket.
 TP Line for drying after washing.
 Diagram from: http://www.customprobiotics.com/about_probiotics.htm
 I had the stomach flu (or Gasteroenteritis...which is not actually related to influenza, so calling it a flu is a misnomer) last week so I really put the wipes to the test! We all know the SF can make things a little messier than normal...in this case you may just want to jump right in the shower and skip the wipe altogether! This works on a normal day but when you have the SF, 20 showers a day isn't great for your skin or the water supply! Alternatively, a quick rinse of your wipe before a thorough soaping goes a long way. I also have to add...there is nothing like a fleece wipe to keep your behind happy in a heavy use situation! No more irritation or stuck on paper bits.
 Typical Nova Scotia Forest
 I read a few websites to get sizes and materials for my two items and settled on ~4-5" for the cloth TP and ~8" for the handkerchiefs. You can make your TP and handkerchiefs out of anything you want but the thickness of the material, especially for the TP, can be an issue. Most sites I read also re-purposed old clothing for this new function. T-shirt material being the thinnest usually needs 3-4 layers to be absorbent enough. You also want to consider the softness of your wipes, whether for your nose or other you definitely want it to be soft...so I opted for fleece. I had the remnants of the sweater I used to make my tea cozy to be used up... so out came my machine and I was determined to stop using paper that very day.
 I only had the top half of the sweater left but managed to make 16 cloth TP wipes (small grey and blue squares) and 6 handkerchiefs. Of course I had to decorate my handkerchiefs. The Calgary logo is where the sweater came from, Diego drew the two sharks for me and I made them out of bits of blue fleece leftover from the sleeves, the sea stars are bits of t-shirts that were kicking around and the flowers are from the same t-shirt my fish on my tea cozy came from! The only new material in all of this was the thread! :) It took 5 hours to make because of the detailing on the hankies but also because I stitched the edges of each of the cloth wipes and hankies to keep them intact even though fleece is not supposed to fray...plus it looks nice to have a border!
 The seastars are my favorite. They are anatomically correct (leave it to a marine biologist!) albeit a little crooked...they were quite fiddly to sew! They were made in the image of a sea star found here in Nova Scotia, Asterias vulgaris or the Northern Sea Star.
 Photo from:http://www.coastalsafari.com/SEASHORE.htm
 Photo from: http://echinoblog.blogspot.com/
 Here it is over my french press.
 I am definitely proud of my cozy. It satisfied all of my criteria, works great, has great character and doesn't look half bad for a free hand job! Best of all, it was reused material and the fish reminds me of my Irish friend Corinne! What better item to make with her fish, she drinks a lot of tea and keeps me stocked with an Irish supply!!
 Mushrooms took a little longer. It took a year of eating mushroom risotto with the mushroom chunks getting bigger with every time we made it to finally be ok with eating them in other dishes. I am now even eating them raw in spinach salad!!!!
 Image from: manjamakan.tumblr.com
 Image from: http://shrimpsuck.blogspot.com/2010_03_01_archive.html
 Image from: http://www.leicesterfoe.org.uk/marine.html
 ...and throwing away anything not in the quota. This deep sea coral grows in the dark cold waters of the Atlantic and took HUNDREDS of years to grow that size and it is just being tossed over the side of a deep sea dragger.
 Image from:http://news.bbc.co.uk/2/shared/spl/hi/pop_ups/05/sci_nat_bottom_trawled0_bottom_cleared/html/5.stm
 Haddock about to be filleted.
 We always cooked all of the fish right away since freezing them or leaving them whole for a couple of days added to the fishy flavour that I don't enjoy. The fish were always less than 15 hours out of the water before they hit our pan. The taste was amazing! No fishy flavour whatsoever and once cooked they kept their fresh taste for the three meals!
 To ease me into eating fish we started with an old favorite....Fish Tacos! These are essentially battered and fried little pieces of fish that you can put into a fresh corn tortilla with some Mexican Tartar sauce and Guacamole. Delicious! We used a typical beer batter (with Corona of course) and the Mexican Tartar sauce is just mayo, pickles and grated carrots! I will post my AMAZING guacamole recipe soon. :) It is a party pleaser.
 After a couple of weeks of fish tacos we ventured to try another Mexican Favorite that I and all of the guests we made it for enjoyed very much and it is very simple...however, I don't remember what it is called! It is fresh haddock fillets layered (in this order) with juliened onions, diced tomatoes, secret sauce (see below) and topped with some dabs of butter. You wrap this all up in a large amount of tin foil and bake it in the oven or BBQ. You want enough foil to be able to flip it often to cook evenly and not have any juices come out. We ate this several times because it is SO GOOD!
 Closer to the end, I started to feel a little more adventurous and we made an amazing baked lemon rosemary haddock with a dill cream sauce. I used fresh rosemary from my garden and dill from the farmer's market. I lay the fillets on a bed of lemons then topped them with a few lemons and sprigs of rosemary and baked them in the oven at 350F until the fish was cooked (30-40 mins). In the mean time I made a creamy dill sauce using this recipe. We ate it with a side of Greek style baked sweet and red potatoes with onions (essentially olive oil with a very small amount of dill, and salt and pepper to taste, baked in my cast iron dutch oven in the oven beside the fish). The combination was AMAZING! Neither the dill or the rosemary were too strong. They were subtle and the combination was perfect. I scarfed this plate down pretty fast!
 One of the last recipes we tried was the Moist Baked Haddock recipe found here. I did substitute the Pepperidge farm stuffing with Italian style bread crumbs.
 We did enjoy this recipe but we really liked the bread crumbs so we would often just bread and bake the fish (no mayo, etc) to eat in tacos (of course with some salsa or guacamole!) or just straight up with some veggies on the side.
 Being an old house and having been converted into flats means that there are many oddities that adds the character that we absolutely love...but can also cause some headaches with home renos because what is standard in new houses...is not in our house!
 Pilot holes to see what is behind the wall. The cupboard you see to the right (with the tupperware) is the one under the drawer in the first photo and that is the back door immediately to the left. This is avery small kitchen!
 Cupboard and the wall taken out...notice no insulation on the outside wall...not even paper!
 We then closed it in with wood that we had in the garage, basement and from the cupboard we removed and plastered the cracks to seal it.
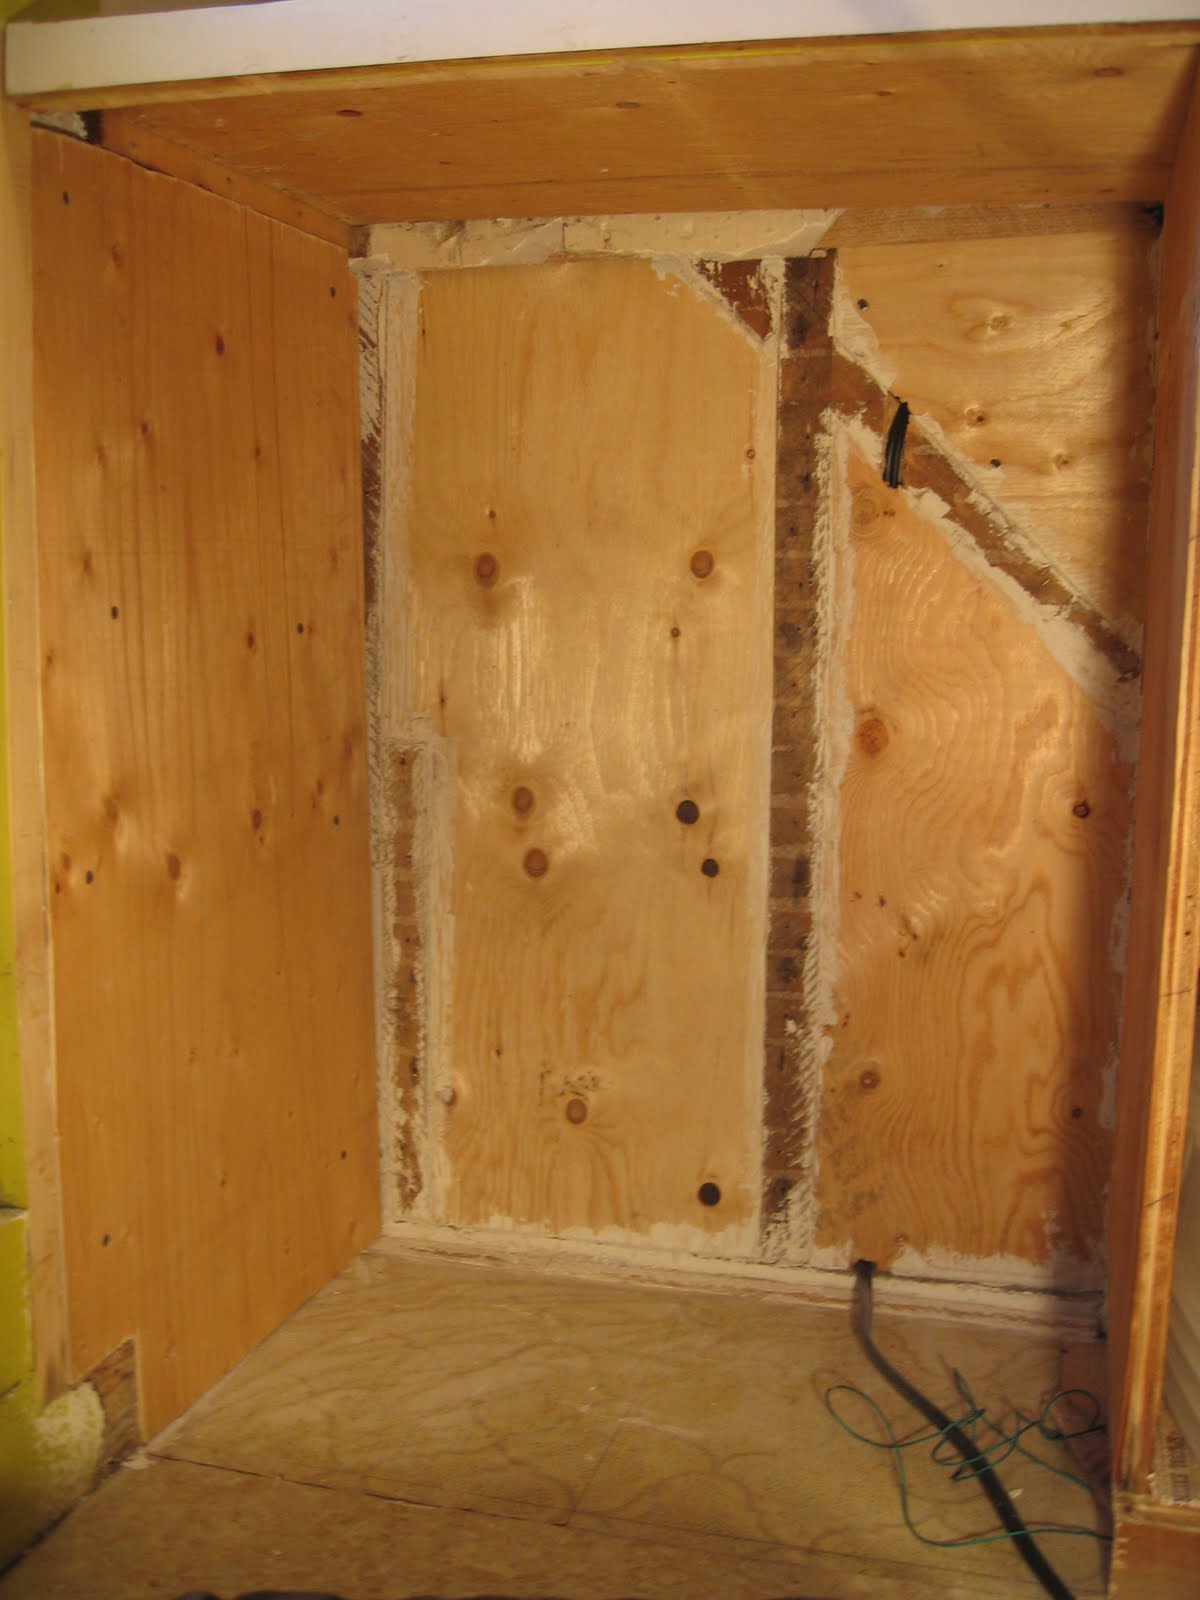
 Our first try.
 However, when we were done it was all painted and the dishwasher slid in nicely, we were glad we did it.
 Cast iron and copper plumbing under the kitchen sink.
 Diego cutting the cast iron pipe with the "Schwarzenegger".
 Our beautiful new plumbing!!!
 When we flicked on the switch to see what the problem was the dishwasher came to life and we had a good laugh!!! It took 1/2 a day to re-wire it and get it right! Time spent so far...4.5 days. The next part is what took us the longest...rebuilding the cupboard in the small space beside the dishwasher. Since our kitchen is so small we had to do something to make this space useable and we of course couldn't make it simple...like shelves...no we decided to make a small larder (aka: a drawer with shelves). We also wanted to reclaim as much wood as we possible could, not just to save $$ but to save TREES!!! This of course made it more difficult because the pieces were sometime bowed but also because this old house is a little crooked!!
 This was such a technical job. So much finicky cutting and adjustments to get it "straight" in a crooked opening!
 It took 3.5 days just to get this built, stained and layer of clear coat!
 But now I have space for our cooking utensils and my teas (yes they take up 3 shelves) and we have a DISHWASHER!! This will save on water and headaches figuring out who will do the dishes!!! :)
 Even though it feels like we should have lost space, we actually gained some in the main part of the kitchen! With a little re-arranging and purging of items not used in years, we now also have a potato and onion drawer!!!
.JPG)

